Restoring Color Underwater#
The previous article described what water does to light — absorption strips color, scattering strips contrast, and every body of water does it differently. The damage is physical and happens before the camera is even involved.
So what can be done?
Underwater photographers have developed a toolkit of techniques — some at capture time, some after the dive. Each one addresses a piece of the problem. None of them addresses all of it.
During the dive#
Getting closer#
The simplest and most effective technique. Absorption is exponential — each meter of water removes a fixed fraction of remaining light, not a fixed amount. Cutting the distance from 3m to 30cm doesn’t just help a little — it removes most of the attenuation path. Wide-angle lenses that allow close focus let photographers fill the frame from centimeters away, dramatically reducing both absorption and scattering.
This is why experienced underwater photographers shoot wide and close: not just for composition, but because the physics rewards it.
Bringing your own light#
A strobe generates a brief pulse of broad-spectrum light at the subject — bypassing the water column’s spectral filtering entirely. Within the strobe’s effective range, colors reappear as if the subject were on the surface. But the double path and exponential absorption limit that range to roughly 1–2 meters in clear water.
Positioning matters: strobes mounted close to the lens illuminate the water column in front of it, creating backscatter. The standard technique is to mount strobes on arms angled outward, lighting the subject from the side rather than head-on. Snoots — conical beam concentrators — help further for macro work.
For close-up and macro work, powerful strobes can overpower ambient light entirely — the subject is lit almost exclusively by the strobe, and the mixed-light problem largely disappears. But for wide-angle scenes, the strobe can only reach the foreground. The background remains lit by depth-filtered ambient light, creating two illuminants in one frame. No single white balance can serve both.
For video, continuous LED lights replace the strobe with steady output. The same physics apply but at lower intensity — shorter range, more noise, faster battery drain.
Filtering the light#
Instead of adding light, color correction filters rebalance the spectrum before it hits the sensor. Red filters (for blue water) absorb blue and green, passing proportionally more red. Magenta filters (for green water) absorb green selectively. These lens-mounted filters are simple, cheap, and popular for video — but the correction is fixed. A filter tuned for 10m depth over-corrects at 5m and under-corrects at 20m. They also reduce total light by 1–2 stops. And they cannot be used alongside bare strobes — the filter would turn strobe-lit subjects deep red.
A related technique: mounting blue or cyan gel filters on the strobes themselves. This cools the strobe output toward the color of the ambient water, narrowing the gap between the two illuminants. With the strobe and ambient closer in color temperature, a single white balance has a better chance of serving the whole frame. It’s an imperfect solution — the strobe still doesn’t match the ambient exactly — but it reduces the mixed-light problem for wide-angle work.
Setting a custom white balance#
A white or gray diffuser cap placed over the lens port, pointed at ambient light, lets the camera calibrate for the current illuminant. It works — but only at that specific depth and angle. Move a few meters deeper and the calibration is wrong. Divers re-take the reading every time depth changes, which is awkward but effective for video at a consistent depth.
The common thread#
Every approach above is a compromise. Strobes work locally but create mixed light at distance. Filters are global but fixed. Custom white balance is accurate but fragile. Getting closer helps everything but limits composition. And all of them demand the diver’s attention — fiddling with equipment, adjusting settings, managing strobe arms — when attention should be on the dive itself.
The alternative is to deal with color after the fact.
After the dive#
Why RAW matters underwater#
The case for shooting RAW is stronger underwater than in any other context. At depth, the red channel is barely registering — but the difference between a faint signal and no signal is everything. A 14-bit RAW file has 16,384 levels to represent that difference. A JPEG has 256. What looks like empty black on screen may still contain recoverable color in RAW — real data, separable from noise, waiting to be pulled back. In JPEG, it’s already gone.
RAW also preserves the sensor’s linear response before any processing, which means white balance can be changed freely after the dive. Underwater images often need extreme shifts that would destroy a JPEG. Shooting RAW doesn’t fix the problem, but it preserves the possibility of fixing it later.
Manual editing#
The standard professional workflow: import into Lightroom or Capture One, set white balance off a neutral reference (gray card, sandy bottom), boost the red channel aggressively, pull down blue, fine-tune with HSL sliders. Local adjustments — graduated filters, masks — handle the strobe/ambient split.
This produces good results in skilled hands. The problem is time: each image may need several minutes of careful adjustment. And it’s subjective — without a reference for what the scene actually looked like, the photographer is making educated guesses about what colors “should” be.
Algorithmic correction#
Researchers have pursued automated approaches for decades. Simple statistical methods — Gray World, White Patch — assume scenes should average to neutral or have a white point. Both fail underwater, where the blue-green dominance isn’t a bias to correct but the actual light 1. Histogram-based methods like CLAHE improve contrast but don’t model the underlying physics 1. Deep learning approaches (WaterNet 2, FUnIE-GAN 3) learn to produce visually pleasing results from training data, but they learn what underwater scenes should look like, not what they actually looked like — a scene outside the training distribution may look plausible but be inaccurate.
The most rigorous approach in the literature is Sea-Thru (Akkaynak & Treibitz, 2019 4) — a physics-based method that decomposes the image into backscatter and attenuated direct signal, then inverts the attenuation per-pixel using a depth map. Each pixel gets corrected by the amount appropriate for its specific distance from the camera. The results are dramatically better than global methods, especially for scenes with depth variation.
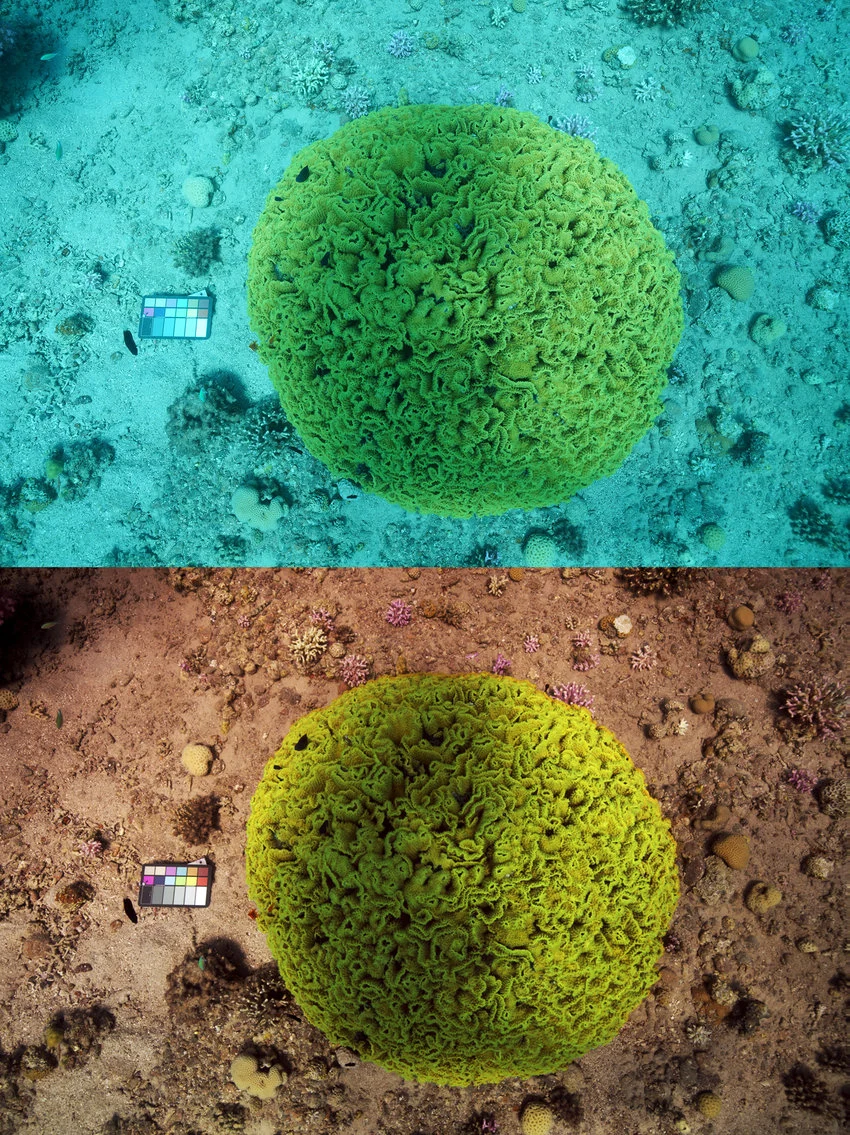 The Sea-Thru method: per-pixel physics-based correction using depth information. Source: Akkaynak & Treibitz (2019) 4.
The catch: Sea-Thru needs a per-pixel depth map. The original work used structure-from-motion — many overlapping photographs of the same scene, plus significant compute. Obtaining accurate per-pixel depth from a single photograph remains the main practical barrier.
Calibration charts#
A different angle: bring a physical reference into the scene. A calibration chart with known spectral reflectance properties, photographed in the same conditions as the subject, tells you exactly how the water column has distorted each channel. Compare what the camera recorded with what you know the chart should look like, and you can compute the correction mathematically.
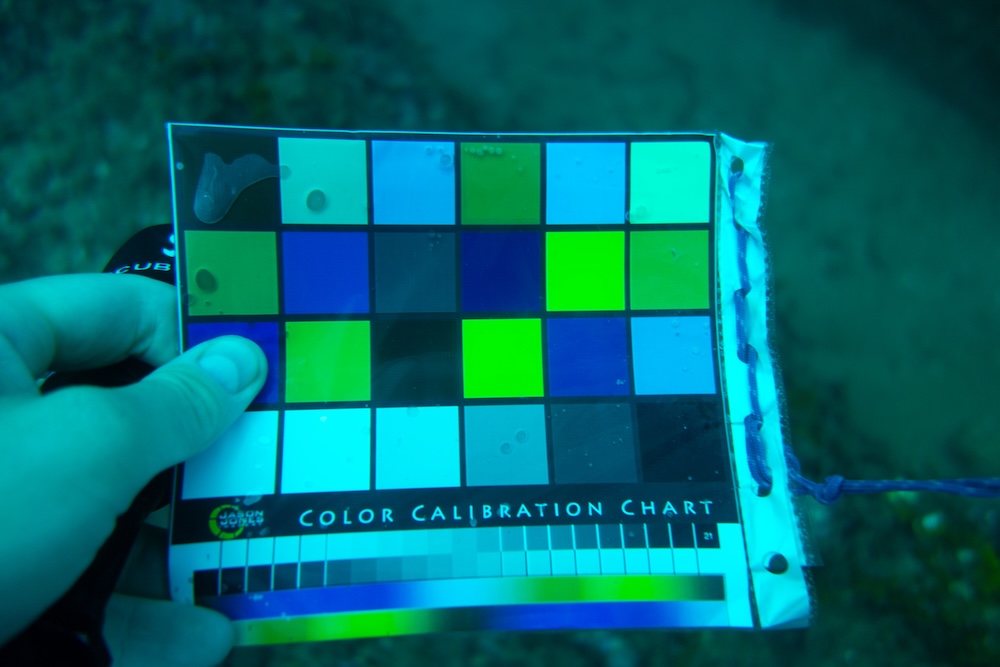 A color calibration chart photographed underwater. The known reflectance values allow precise correction — but only for the chart’s position in the frame.
This is the most accurate approach — but only at one point. The chart calibrates for its specific position. Subjects at different distances get over- or under-corrected. A strobe-lit chart doesn’t calibrate for the ambient-lit background. And conditions change during a dive as depth, current, and sun angle shift. On top of that, carrying and deploying the chart adds friction to the dive workflow.
The gap#
Every approach solves a piece of the problem:
- Hardware restores light locally — but can’t cover the whole scene, and demands the diver’s attention
- Manual editing can produce beautiful results — but it’s slow, subjective, and requires expertise
- Algorithmic methods are fast — but either too simplistic (statistics) or too opaque (deep learning) to be reliably accurate
- Physics-based correction gets closest — but needs depth information that’s hard to obtain
- Calibration provides ground truth — but only at a single point in space
What’s missing is a way to combine the best of these: physics-based correction that understands the structure of underwater light loss, applied per-pixel using depth information, working from a single photograph, without requiring the diver to do anything special at capture time.
That’s the direction ScubAI is pursuing.
References#
-
Schettini, R. & Corchs, S. (2010). “Underwater Image Processing: State of the Art of Restoration and Image Enhancement Methods.” EURASIP Journal on Advances in Signal Processing, 2010, Article 746052. ↩︎ ↩︎
-
Li, C., Guo, C., Ren, W., Cong, R., Hou, J., Kwong, S. & Tao, D. (2019). “An Underwater Image Enhancement Benchmark Dataset and Beyond.” IEEE Transactions on Image Processing, 29, 4376–4389. ↩︎
-
Islam, M.J., Xia, Y. & Sattar, J. (2020). “Fast Underwater Image Enhancement for Improved Visual Perception.” IEEE Robotics and Automation Letters, 5(2), 3227–3234. ↩︎
-
Akkaynak, D. & Treibitz, T. (2019). “Sea-Thru: A Method for Removing Water From Underwater Images.” Proceedings of the IEEE/CVF Conference on Computer Vision and Pattern Recognition (CVPR), 1682–1691. ↩︎ ↩︎